
Each individual has their own camping/touring equipment list. And they will differ, but in many ways they are very similar. I always appreciate viewing other touring cyclist’s equipment lists and it’s the finer points that I like to wheedle out of someone else’s packing list – just in case I’ve forgotten something!
Although the temptation is to take along the proverbial “kitchen sink,” especially if you have the room; trailers are a good example where over-packing can occur! The thing to keep in mind is that you’re going to have to haul all that stuff up every little hill and mountain pass and that’s when you’ll feel every ounce!
What’s the ideal weight? Who knows? I’ve met cycle tourers carrying from a low of 15 pounds to an astonishing 70 pounds plus! Weekend jaunts may require less “stuff,” but I seem to find that I need almost as much for three days as for three weeks! Nonetheless, a small penalty for the freedom of open air camping rather than looking at four walls in a motel/hotel room.
Certainly, some cyclists travel with minimum standards and are still fully self-contained with tent, sleeping bag etc., although they probably divest themselves of any “luxury” items. I feel that some items, even though they add weight to my load, are more beneficial for their comfort factor; e.g. a book or eBook reader, a tent light, a thicker sleeping pad, a roomier tent etc.

So, the following is my list for you to peruse and discover those little items that you just can’t live without or perhaps never thought of taking along!
Yes, my list below looks like a lot of stuff! But the items are basically only my checklist, and although I generally carry a good portion of the items listed, I do “cherry-pick” items for my kit according to where, when and how long I will be touring and/or camping.
| Tools & spares kit | first aid/personal items | food kit |
|---|---|---|
| Adjustable Wrench (opens up to 15mm for pedals) | Tylenol & Aleve | Trangia Cookset |
| Hand Wipes & Rubber Gloves | Camp Suds/Soap | Stove Fuel/Matches/Lighter |
| Allen Wrenches & 8, 9 & 10mm Wrenches (or Multitool) | Sun screen | Steripen Water Purifier or other Water Treament |
| Tire Pump | Medical ID/Insurance | Water Bottles |
| Spoke Wrench/Spokes and/or Kevlar Spoke | Insect Repellent- Deet | Utensils (Spork) |
| Chain Lube | Hydrogen Peroxide (Small) | Tea/Coffee/Hot Choc. etc. |
| Tire Levers | Personal Medications | Cup |
| Spare Folding Tire, 2 tubes, Patch Kit, Tire Levers etc. | First Aid Kit (dressings, band-aids, ointments etc.) | Dried Food/Oatmeal/Noodles etc. |
| Duct Tape (small amount) | AfterBite Treatment | Ziploc Bags |
| Misc. nuts, bolts, screws, links etc | Bag Balm or Chamois Lube | Small Scouring Pad/Scraper |
| Spare Shift Cable | Pack Towel | Salt/Pepper/Spices |
| Zap Ties (various sizes) | Oral Hygiene Items | Folding Water Bottles |
| Tire Boots (Scraps of “Tyvek”) | ||
| Leatherman | Brandy/Whiskey – Purely medicinal 😉 | |
| Hypercracker/Stein Mini-Tool |
| sleeping & in camp | clothes | Safety & misc. |
|---|---|---|
| Tent & Groundsheet | Shorts & Padded Riding Undershorts x 2 | Maps, Notebook, Pencil, Reading Glasses |
| Sleeping Bag & Pad | Riding Socks x 2 pair, wool | Cell Phone, Digital Camera, Kindle, USB Cable, Charger etc. |
| Pillow Bag (Stuffable) | Swim Shorts | Bear Spray |
| Petzl Headlamp | Jerseys x 2 & T-Shirt | Headlight (doubles as Flashlight) |
| Ear Plugs & Eye Shade | Down Jacket (Stuffs for Pillow) | Whistle & Compass |
| Pee Bottle | Underwear x 1 or 2 (Yup, that’s all you really need!) | Garmin Inreach Explorer+ – Satellite Communicator & GPS |
| Toilet Paper & Travel Wet Wipes | Teva Sandals (my bike shoes) | Tie-Down Straps, Bungees, SilTarp & Twine/Cord |
| Razor | Flip/Flop Shower Sandals | Spare Batteries |
| Very small Folding Sink | Helmet, Bandanna, Bike Gloves, Sunglasses, Windbreaker | Charge Cards, Cash, Wallet, ID, Passport etc |
| Thermarest Seat Pad | Warm Wool Socks | Small Clothes Pegs x 8 & Line/Cord |
| Helinox Chair | Light Merino Wool Sweater | Bike Lock & Cable |
| Basil | Rain Pants, Rain Jacket, SealSkinz Rain Gloves & Socks | Saddle Rain Cover(Plastic shower cap) |
| Hat & Toque |
Now you, may need all, some or more!
My preference is to use panniers for cycle touring and camping, but each to their own. Panniers or trailers were and still are the de facto standard for many cyclists to carry their gear. In the last few years “Bikepacking” has become quite popular as a means of carrying a reasonable amount of equipment for the same purpose – adopted mostly by the mountain bike/gravel bike riders who want to explore the off road opportunities of multi day travel. Bikepacking is basically strapping your gear onto various parts of a bike instead of stuffing into panniers. The proliferation of manufacturers creating many variations of bags and rolls that can accommodate that style of bike travel has really boosted the practice for the fast and light crowd. Now it is relatively easy to find bags that are able to strap on the handlebars, seat post, forks together with frame bags and the such like. It really doesn’t matter what method you may choose other than figuring out which will work best for your style of cycle touring and/or camping within the limitations of the bike that you have or will have.
Regardless of the methodology, packing up all your gear with some semblance of order can be very useful if you need to find something in a hurry. Packing up your raingear in the bottom of a full pannier is tempting the fate of the rain gods!
I found that when I used a BOB single wheel trailer with its large (cavernous!) bag, my packing was somewhat easier than when I travelled with panniers. Although one catch was that I had to pack everything in stuff sacks, or I would end up with a jumbled pile of camping gear. But most of the stuff was easy to recognize and I used different coloured sacks for the smaller items so that I could distinguish the contents at a glance.
The stuff sacks are still used now when I pack for a trip using just panniers for the same purpose.
Another issue with the single large bag, was that once packed and bungeed down to the trailer, it was difficult to get into for any items that I may have required in a hurry. Especially so if it started to rain and I didn’t want to expose all the contents to the elements. That’s why I ended up using two small panniers on the front rack of my bike – one for food and supplies, and the other one contained my raingear, tools, spares, and first aid kit.
I never cook or eat in my tent when camping; hence I use a separate bag (bear bag) inside my front pannier, that I can deposit all my food and “smellies” (toothpaste, deodorant etc.) into, then hang from a tree branch for the evening. For this purpose, I carry a very small stuff sack with approximately 50 feet of light nylon line tied to the pull cord of the stuff sack. I can then put a small rock into the stuff sack, which makes for lobbing the line over a tree branch an easier task. Once the line is set up, I can tie one end of the line to the food bag then hoist away, securely tying the other end to a convenient place. Ideally, the bear bag should hang ten feet away from the trunk and 15 feet above the ground. Or string a high line between two trees and hang the bag in the middle of the high line.
After a few trips, I realised that trailers, at times, were more of an annoyance than a benefit, so I reverted back to panniers and have never looked back! I now use Ortlieb Bike Packer Plus (20 litres each) panniers on the rear rack with a dry bag for the tent on top of the rear rack.
Despite that, now with the e-Drive addition to my Surl-E Disc Trucker I’ve lost the top of the rear rack position to a battery, so I’ll add my two small Ortlieb Front Roller Plus (12.5 litres each) panniers to a front rack. I’ll pack any heavier items into those two front panniers and the lighter, bulkier stuff will pack into the rear ones. Using this method the weight of all the gear will be distributed more evenly and a lot of load being taken off the rear wheel. The front panniers also provide extra stability for the front end of the bike to prevent it from feeling squirrely and especially light as when riding uphill with all the load on the rear wheel.
In addition to good quality waterproof panniers (or good pannier rain covers if not waterproof), good solid racks are must to hold all the weight of the panniers. My personal preference are Tubus racks which I’ve used for many multi day/week/month tours without one failure. There are many other brands of racks available, but buyer beware! For panniers, check the reliability of the mounting and anti-sway system used. A pannier full of gear swinging out from the bike on a corner is a dangerous situation!
I also carry a small piece of plastic tarp (approx. 18″ x 48″). For dirty/sandy conditions it comes in handy to spread this out in the vestibule where I enter and exit the tent. Much cleaner and better than crawling out onto mud or other silt or dragging debris into the tent.
In addition, I carry a SilTarp (5ft. x 7ft. and extremely lightweight). For shade or rain shelter, I can attach my SilTarp to my tent for an impromptu awning to cook or rest under. In the event that there is nowhere to attach the front of the SilTarp, I have a method figured out that uses the bike to support the front of the awning; that way the bike is under cover too!


Personal effects, such as my camera, cell phone, wallet, passport, maps, meds, sunscreen, a snack or two etc., all travel in my Ortlieb handlebar bag for easy access whilst I’m on the road. The bag is also easily removed and always taken with me when I go into a store, restaurant, washrooms/showers etc., in other words, I never let this bag out of my sight and/or reach! That way if my bike disappears (perish the thought!) then at least I’ll have my ID, money and meds etc.
One good point to bear in mind, when packing panniers, or any type of trailer, is to pack the heavier items at the bottom, this will lower the centre of gravity of the bike and/or trailer, which will result in a much more stable ride. Packing too much weight high up, on racks or a trailer, may result in shimmy of the bike and/or fish-tailing of the trailer. Also with trailer loading, it is important to pack heavier items at the front of the trailer. A trailer that is light on “tongue weight” will fishtail very easily and uncontrollably especially at higher speeds.
Cooking
As far as cooking is concerned, I’ve always used a Trangia alcohol stove – extremely windproof. Alcohol fuel is very easy to find and there is nothing to pack out such as empty gas cannisters. I use a Trangia T27 cookset which has the burner, two hard-anodized one litre saucepans and a small non-stick fry pan, all packaged neatly into the windshield. I only ever take one of the one litre saucepans and the fry pan/lid with me on tour. I also pack along the Trangia aluminium mini-kettle which weighs very little and fits neatly into the saucepan for packing. The burner and a small plastic measuring cup fit inside the kettle – very compact and easily packed.


The larger Trangia T25 cookset has the same burner as my T27 (in fact, all Trangias use the same burner), but the T25 cookset itself is a bulkier and heavier unit; although perhaps fine for two or more people who are willing to share their creations. Using a comparison of time to boil water… The Trangia is a little slower than a butane or white gas (naphtha) stove, but simple to use with no moving parts to break down or clog up, and it is very quiet… read: silent! Moreover, I’m not in a hurry when I’m cooking in camp, as there are usually other chores to do while I wait for my kettle or pot to heat up.
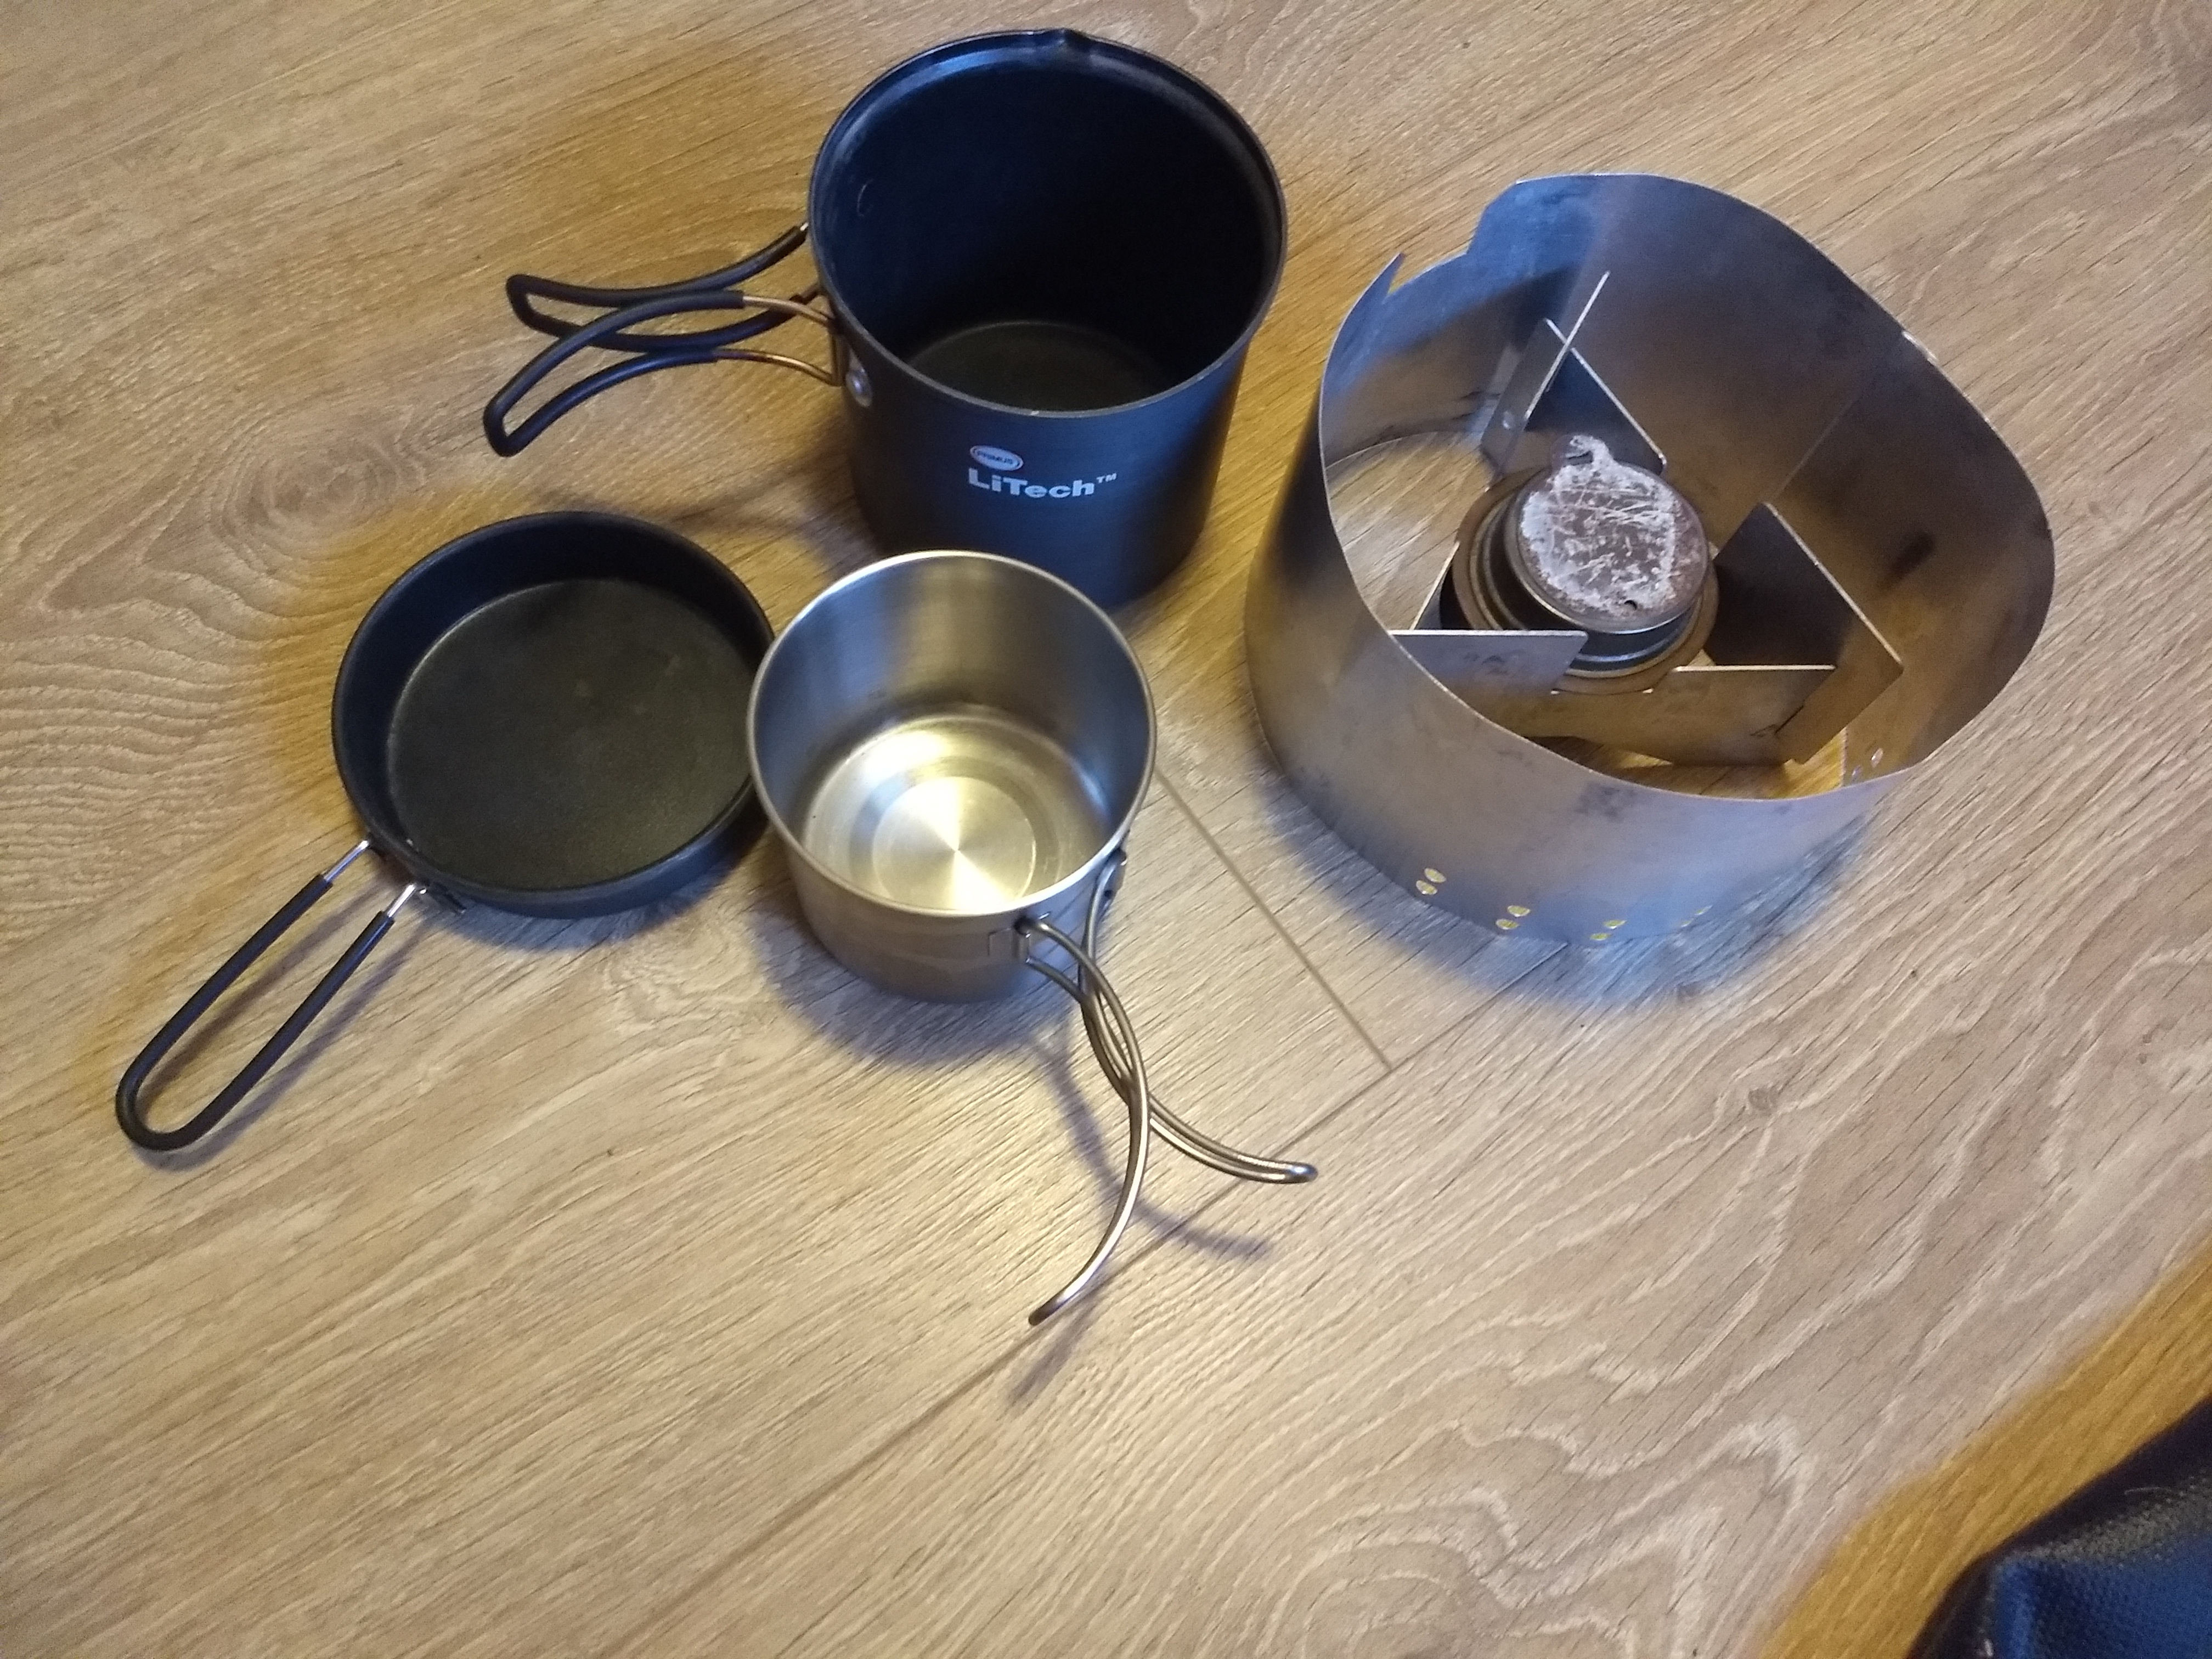
I also have a Trangia Westwind stove that makes for a lighter load and which I will carry on trips when I don’t plan on cooking a great deal. I carry one pot, a Primus Litech with a lid to use with the Westwind. I fashioned a windshield from some roof flashing for this setup which fits inside the pot together with the burner and my cup. This all fits into a small stuff sack together with the folded stand.


Be mindful of the water being used while cooking. Having a good supply of fresh water on hand is very important when it comes to camping, especially if wild camping, and there are several types of filters available to fill up bottles or containers with fresh water while on a camping trip. Whether it is for cooking or for drinking, water is essential to having a safe and enjoyable camping trip.
I’ve used both pump type filter/purifiers and a Steripen. For my style of bike camping at present, I can just manage with the Steripen and some purifier tablets in case of the Steripen malfunctioning.
Tents and Sleeping Bags
I‘ve had several tents over the years and all but one have been well utilised with little to no problems. The only one I disliked was mainly due to its inability to withstand an average wind and also the zipper on the fly was only one-way, top to bottom and no vents the peak!
Even though I generally travel solo, I usually buy a two person tent as I prefer to have that extra space for me, my gear and of course Basil. I did own one single person tent that I only used for one trip when I knew I would be using motels mostly and camping infrequently. Even though that tent was OK, I reverted to my two person tent after that tour down the west coast of California.

MEC Camper 2 Tent 
MEC Tarn 2 
REI Quarter Dome 1 
REI Quarter Dome T2 
Sierra Designs Lightning
The following is my list of tents in chronological order…
- MEC Tarn 2 – a great tent but with only one door at the end and a tunnel type design which made exit and entry a little challenging.
- Sierra (Poor) Designs Lightning – flimsy carbon poles and the zipper made this tent a flop.
- REI Quarter Dome T2 – a really nice two door/vestibule tent that I used extensively.
- REI Quarter Dome 1 – also a nice lightweight tent, only used for that one trip I mentioned above.
- MEC Camper 2 – my present tent, also has two doors/vestibules and the heaviest backpacking/cycle touring tent that I have owned at a tad over 5 pounds. I sacrificed a little weight for comfort and durability. Overall I’m very satisfied with this replacement for my Quarter Dome 2, which I basically wore out.

Inside the tent for my sleeping arrangement I’ve used Thermarest pads, a Big Agnes (BA) Aircore Pad and now have a Klymit Static V air pad that I’ve found to be very comfortable and shaped well to prevent me sliding off to the side. I used the BA Aircore for many trips and it was very comfortable, but fit into a sleeve on a BA mummy bag that I owned – it was impossible to roll off the pad, but this also limited my sleeping positions. I grew tired of the constrictions of the mummy style bag and attached pad so let them go.
I replaced the BA down sleeping bag with a Nemo Disco down bag. The Disco is a wide spoon shaped, roomy mummy style bag designed for side sleepers (the position that was difficult for me in the previous BA mummy bag with attached pad) and I’ve found it to be very cosy and comfortable. A good upgrade for me.
Sleeping comfort when bike camping and cycle touring riding is very important as your body needs to rest well for the next day’s physical activities. What works for me is subjective, so pick your pad and bag carefully for your own comfort level. A good tent and sleep system can set you back a decent amount of cash, but they are the two items that can let you really enjoy your camp time, or make your time in the tent miserable by using cheap, inadequate or uncomfortable equipment!
There are lots of pros and cons as to whether use a down sleeping bag or one with synthetic fibres. If constantly camping in damp conditions, and although usually heavier and less compressible than a down bag, a synthetic bag is probably the better choice. synthetic fibres will still keep one warm when a little damp, whereas a down bag loses its insulating value the damper it gets, and then is difficult to dry. Choose wisely as to your expected travel venues and weather conditions at the time of year you will be camping.
Bike Camping Safety
Leave a Trip Plan with a responsible party, family member or friend. They can notify authorities if you don’t return when expected.
YOUR LIFE MAY DEPEND ON IT!
Depending on your choice of a touring destination, you have a possibility of encountering any manner of hazards. Here in Canada & North America, probably one of the foremost concerns when camping, can be from a chance encounter with wild animals. There are many animals in the wild and many of them are relatively harmless; they may eat through your pannier to steal your food, but otherwise are non-threatening. Cougars, wolves and bears are another story…

ISBN-13 : 978-1594850288
Bears are one of the most common and dangerous visitors to campsites and it is very prudent to follow basic clean camp rules so as to not present oneself as a food morsel! There are many good books written on bear-safe issues and I can highly recommend “Backcountry Bear Basics, by David Smith” – for an easy reading and informative guide. I will not try to repeat everything that I have learned, but would still advise anyone camping in bear country to follow some very basic guidelines…
- If camping in the bush, check around your intended campsite for bear scat or a food cache that an animal may return to.
- Don’t cook in your tent, the material of the tent will absorb cooking odours and attract wildlife.
- Don’t store food in your tent, bears have an amazing sense of smell and are very curious.
- Don’t store toothpaste, deodorant or other fragrant items in your tent, bears don’t know the difference, until they’ve tasted it. You don’t want them that close!
- Load all your food and other fragrant items in a stuff sack or pannier, and hang them at least 10ft high off a tree branch and 6ft to 8ft away from the trunk if possible. Hang the items as far away from your tent as practicable. If the campground has bear-proof containers, use them.
- If the bear threat is high, consider cooking and eating items of low odour, e.g. beans or lentils instead of seafood or meat. Or perhaps plan for a cold meal, thereby not producing any cooking aromas at all.
- Carry your food, on the bike, in a separate sealed bag or pannier, that way clothing etc. will not retain any food odours.
- Don’t dispose of your cooking waste and dishwater close to camp, even if you are leaving; think of the next person that may want to set-up camp there. Take it a good distance away and bury it.
The above are just a few tips, but the best advise is to use common sense!
With regards to Cougars, be very vigilant when travelling at dusk or dawn in cougar country, as that is when they are the most active. They usually attack from behind and sometimes from above overhanging tree branches. Cougar attacks on full-grown humans are very rare, but have occurred here in British Columbia, Canada (amongst other locations); on two of those occasions the attacks were on cyclists at dusk! Fighting off a cougar would be no mean feat if you were on your own, and I can only imagine that it could be a very traumatic, if not fatal experience.
Grey wolves inhabit the majority of Canadian Provinces and Territories, but a wolf attack on a human would be even more uncommon, however I have read a report of a pair of wolves stalking a cyclist alongside a road in Northern Ontario, Canada. And, by all accounts, that is unusual behaviour for wolves, but certainly shows that one should strive to be prepared for the unexpected!
Other items of basic camp safety and common sense…
- Be careful with stove fuel, don’t try to refuel a stove when it’s hot.
- If you have a campfire make sure that it’s extinguished properly, when you leave, don’t start a forest fire!
- Don’t cut down living trees or saplings, use dead-falls and branches from the ground for a campfire if allowed (some parks and campgrounds prohibit this practice).
- Don’t build a bigger campfire than you really need, remember it’s a campfire, not a bonfire!
- Carry a first-aid kit and know how to use it; study up on some basic first-aid before a trip. You won’t have time to read the manual when you really need to use contents of the kit.
- Use garbage containers at campsites and recycle what you can if a procedure is available. If you bush-camp, use “no-trace” procedures; pack out everything that you pack in. If you find that you have something you don’t want, don’t leave it for someone else, they probably don’t want it either!

On my X-Canada trip I mailed 20% back home after 10 days. On my O-Australia trip I had third of my rear panniers untouched. We all learn I guess.
P.S. I do not carry cooking stuff. Ever.
LikeLike
I like the option of having some form of at least boiling water! I like my tea and coffee!
LikeLiked by 1 person